How to cultivate and care for your butterfly larvae
Elementary/Middle School
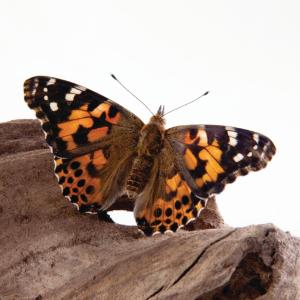
These painted ladies are more than just a pretty face - they’re a robust teaching tool for your life science classroom.
Painted Lady Butterflies, or Vanessa cardui, sp. can be used to:
- Demonstrate a full life cycle
- Visualize development quickly - most develop between 14 to 26 days
- Study habitats and environments
Follow these 8 steps to properly cultivate and care for live Painted Lady Butterflies in your classroom:
1. Order live butterfly larvae from a reliable source:
To have the best success with raising butterflies in the classroom, you must get live specimens that are fresh, healthy, and ready when you are. You’ll also want to plan ahead by getting the necessary material and equipment to feed and care for your indoor butterfly enclosure properly. When you order your live materials, make sure you select a delivery date so they arrive exactly when you need them.
Ward’s Science has on-site living materials labs that carry the widest selection of live specimen options and are located from coast to coast - so it’s a perfect choice! You can have a touch of spring any time with our lab-reared Painted Lady Butterfly larvae; they’re available year-round.
If you’re short on time or want to be sure all your bases are covered, you should go with Ward’s Painted Lady Butterfly Complete Culture Kit. It has the media and all supplies included and is available in three different sizes. Of course, you can still purchase items separately.
2. Care for your butterfly larvae when they arrive:
It’s possible that a few of the little critters won’t survive shipping. So be sure you get more live material than you need. Ward’s Science always overpacks their live materials orders; we’ve got you covered.
If some larvae aren’t moving, that’s totally normal. It could be for one of two reasons:
- Cold temperatures are slowing them down. Once the cup comes up to room temperature, you should see signs of life after an hour or two.
- It’s not unusual for those little buggers to have raging hormones (ecdysone), which triggers the molting process. If that’s the case, they might not move for a few days. After a day or two, you can check and see if they’ve moved or if they’ve eaten any food. Once the molting larvae have emerged and begun eating, you can start transferring them to cups for student use, as described below and on the video.
3. Preparing food and containers for butterfly larvae:
Your larvae will most likely arrive all in one container; To prepare them for study and observation by students, you’ll need to divide the larvae into smaller individual containers and ensure they have enough to eat throughout the caterpillar stage.
Food, or media, for your larvae comes in two forms, including powdered or pre-mixed. It’s available in a variety of package sizes to ensure there’s enough to go around.
If you’re using powdered media, measure and mix the media with water according to the package instructions until it resembles the consistency of cookie dough. If you’d rather skip this step, pre-mixed media is ready to use.
Our complete culture kit includes your choice of powdered or pre-mixed media, and enough cups to house all the larvae in your kit.
After you’ve mixed the food, push a teaspoon of the food into each cup or container. Pushing the food at an angle helps waste fall to the bottom and not lay on the food. Don’t forget to poke a couple of holes in the lids so the larvae can breathe! Pushpins work great for this.
4. Transfer your butterfly larvae to individual cups:
Larvae are very fragile. They should be at least one centimeter in length before transferring them, so they don’t get hurt. Use a paintbrush to move them; fingers can also damage them. Cover them with a lid and place the cups at room temperature and out of direct sunlight. Put them in a place where the students can view them without disturbing the cups.
Got too many larvae leftover? That happens sometimes. But you can never have too many butterflies, so just order some additional cups and food to raise them. You can also release the extra larvae outside onto a bush or a plant. Caterpillars are pretty fussy about what they’ll eat! Each species will only eat a single plant (or closely related plants). The particular plant that a caterpillar must have is called the host plant. Painted Lady butterflies are particularly fond of plants from the Malvaceae and Compositae families. If you have a Malva Bush nearby, that’s an excellent place to release any extra painted lady larvae you may have. Otherwise, we recommend following instructions for proper euthanization or disposal outlined in our care and handling guide.
5. Monitor how the caterpillars grow:
The caterpillars grow fast, producing silky strands that provide shelter and help them move around the container. The caterpillars will excrete waste that looks like brown balls on the surface of the food. You don’t have to remove the waste.
It’ll take about two weeks before they form a chrysalis (pupa). Sometimes the caterpillars get sluggish while growing, but that’s a normal part of the molting phase. This would be a perfect time to remind your students about the five molting stages: first instar, second instar, third instar, fourth instar, and fifth instar. During the fifth instar, the new skin underneath forms the outer shell of the chrysalis.
6. Transfer the chrysalides to a larger cage:
It’ll take about two weeks for the caterpillars to grow fully. That’s when they’ll stop feeding and crawl to the top of the cup and attach to the plastic lid. Keep curious hands away from the display at this fragile stage. When all the chrysalides have formed, give them another 24 hours to harden before putting them into the cage. Just remove the cup’s lid and tape it to the inside of your cage. Electrical tape or masking tape work well.
The container you use should have holes that let in air but aren’t too big for the butterflies to escape through. The habitat that comes with our complete culture kit has the perfect dimensions, so there’s no guesswork for you.
If any of the chrysalides have fallen, you can reattach them by taping a small-pointed tip of a cotton ball or household string to the cage’s lid or wall. This is a good opportunity to explain to students how hanging the chrysalides allows the butterfly’s wings to develop normally. The new butterfly’s organs, antennae, and legs are also forming inside so, if students are helping you in this process, caution them not to puncture or squeeze the chrysalides. Use clean fingers or insect forceps for extra care in handling.
Although the pupa doesn’t need food in this stage, it does need moisture. Mist the chrysalides a few times a day to keep them from drying out, particularly when in a low humidity (<40%) environment.
7. Watch as adult butterflies emerge from the chrysalis
In about one more week, the chrysalides emerge as butterflies, and after a short period of pumping up their wings, they’ll be ready to fly! During this time, the butterflies may excrete a red-colored liquid called meconium. That’s a normal waste byproduct of the transformation process. Butterfly meconium is made of the leftover part of the caterpillar that wasn’t needed. It sounds a bit gory, but you can explain that to become a butterfly, a caterpillar first digests itself, releasing enzymes (called caspases) to dissolve its tissues. While the specialized cells used to form the butterfly parts survive, the leftovers are expelled as meconium. It’s a mind-blowing journey from guts to glory once the butterfly emerges. It’s true what they say about butterfly metamorphosis, “no guts, no glory!” Well…somebody must have said it some time.
8. Feed your adult butterflies and enjoy them for up to 4 weeks
After all your butterflies have emerged, you can provide a food source for them by making a sugar-water mixture; a 20% solution is recommended.
Be sure to replace the sugar water every few days. If you want to treat them extra special, use brown sugar instead of white and add some fruit slices to the cage. Just be sure not to clog up their mouth tubes by using honey! Keep the adult butterflies well hydrated by misting them a few times a day.
You can keep the adult butterflies safely in the cage for their 2 to 4-week life span.
To save you time in your Painted Lady butterfly lessons, our Complete Culture Kit includes everything you need to get started – including a pop-up mesh pavilion, larvae, setup instructions, and enough media to take them from caterpillar to butterfly. Watch the video above to see how to get started!
For more detailed information on how to care for Painted Lady Butterflies and larvae, check out our complete Painted Lady Butterfly Care and Handling Guide.
We hope you enjoy raising your butterflies.
If you have questions or need additional support, we’re always here to help from our science labs to yours. Email sciencehelp@vwr.com to speak with a live materials lab technician or contact our customer service team with questions about your order.
Recommended products:
Click here to order butterflies from our Canadian brand,
Boreal Science.
[StartProductBlock]
Ward’s® Painted Lady Butterflies, Complete Culture Kit
Vanessa cardui butterflies form chrysalides and transform into colorful butterflies right before your eyes. Comes with everything you need to raise larvae to adulthood: complete kits, butterfly eggs, live larvae sets, or food and supplies
[EndProductBlock]
[StartProductBlock]
Ward’s® Live Painted Lady Butterfly Larvae: Pack of 5
Watch and learn all about the amazing life cycle of a butterfly! Experience the complete metamorphosis of Painted Lady Butterflies from larvae to beautiful adult butterflies.
[EndProductBlock]
[StartProductBlock]
Ward’s® Butterfly Life Cycle Poster
Clearly represents all stages of metamorphosis. A variety of North American butterfly species are represented.
[EndProductBlock]
